


The ridges of tiled roofs can weather and eventually leak. Fixing or replacing them is a simple enough job, it’s the fact you’ll be working at a height that’s daunting. Don’t take chances – buy or hire a harness to wear whenever you’re working on the roof. Also watch out for hazards such as electrical cables, tree branches and antennas.
STEP 1
Preparing the tiles Remove loose caps and chip away old mortar. Sweep the roof. Chip old bedding from caps using an angle grinder for stubborn pieces. Attach small cut tiles by nailing a 75mm galvanised flathead nail in the top of the hip rafter and secure with wire.
STEP 2
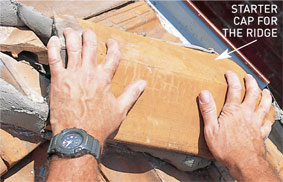
Mix the mortar Lay caps in position and mark with chalk. Mix four parts bricklayer’s sand to one part cement, add water until creamy. Lay sausage-shaped mortar inside the chalk line. Secure starter cap with wire around a 75mm galvanised flathead nail 150mm above.
STEP 3
Lay ridge caps Press in the starter cap, keeping mortar 20mm thick at highest point of the tile. Lay all the caps. Fill gaps with mortar and flush to the edge of the cap. When dry, trowel flexible coloured pointing compound 5mm thick over the mortar and collar of the caps.
Mortar makeover
Mix just three bucketfuls of mortar at a time as it needs to be used within about 45 minutes.
Apply only enough mortar to lay two caps at a time as the mortar should be tiled over within about 10 minutes of being laid.
Add a little water regularly to mortar for a workable consistency.
Mortar should stick to the trowel but slide off when the trowel tilts.
Be Neat when applying flexible coloured pointing compound.
Use flexible coloured pointing compound at 45° over cap collars for a good weather splay.
Weep Holes are needed at the flat point of every second tile when laying concrete ridge caps.


